Host your development infrastructure with Napptive – Part 1


Getting Started with Git Repositories
The term “application” has become synonymous with consumer-oriented software designed to enhance end-user experiences. However, what often remains overlooked are the critical operational applications that play a crucial role in any organization. These are often the backbone of business operations, handling tasks ranging from internal communication to data management and beyond.
We are going to produce a three-part series of articles showcasing how you can host your development infrastructure with Napptive, and we will begin the series by deploying GOGS, a self-hosted git repository system.
Why should you host your own infrastructure?
Data security has always been one of the most important aspects that organizations care about. With major organizations such as GitHub starting to use the billions of lines of code that are there in the repositories to build AI models, often organizations’ repository code is at risk of getting exposed. Hence self-hosted solutions are getting popular nowadays.
You have complete customization control over the whole infrastructure and application, and you can also set up your own infrastructure as a Homelab.
Deploying to Napptive Catalog makes your infrastructure reusable, making it much easier to redeploy in different environments in multiple zones!
Let’s get started with the OAM definition.
apiVersion: v1
kind: ConfigMap
metadata:
name: gogs-config
data:
app.ini: |
RUN_MODE = prod
RUN_USER = git
BRAND_NAME = napptive-gogs
; add more production configuration as required or leave as default
—
apiVersion: core.oam.dev/v1beta1
kind: Application
metadata:
name: gogs-deployment
spec:
components:
— name: gogs-webservice
type: webservice
properties:
image: nimish8/gogs
cpu: “50m”
env:
— name: SOCAT_LINK
value: “false”
memory: “512M”
ports:
— port: 3000
expose: true
traits:
— type: napptive-ingress
properties:
name: gogs-ingress
port: 3000
path: /
— type: storage
properties:
pvc:
— name: data
mountPath: /data/
resources:
requests:
storage: 1Gi
configMap:
— name: gogs-config
mountPath: /configDir
# emptyDir
# — name: data
# mountPath: /data
Let’s break down each major component:
apiVersion: core.oam.dev/v1beta1 — Refers to the OAM API defined by Kubevela. It provides all the necessary CRD’s for the Application type so that those can be used by Kubernetes runtime.
kind: Application — This is the actual CRD defined by Kubevela to refer to a complete application. This is the main entity that the OAM model uses and this is where you define your application components and configurations.
components — Defines the actual services and workers that are composed to make the application work. Each service in a microservice architecture can be thought of as a component.
webservice is a component type defined by Kubevela that handles network requests. Find more about different component types here.
traits — Modifies the services to have extended capabilities such as ingress endpoint, storage classes, and much more. Find more about traits here.
With a basic idea of each OAM component defined in the YAML file, we can now go through the file, explaining its working.
GOGS config map defines the production configurations for the server. Add your own configurations by following this link.
apiVersion: v1
kind: ConfigMap
metadata:
name: gogs-config
data:
app.ini: |
RUN_MODE = prod
RUN_USER = git
BRAND_NAME = napptive-gogs
; add more production configuration as required or leave as default
Gogs web service is the main service that contains wrapper images that contain actual gogs/gogs images along with additional scripts to load production configuration. At this level, we also define the port that the application listens to (3000) and CPU and Memory requirements. Also, we change the environment variable SOCAT_LINK to false as mentioned in GOGS documentation for K8s. For other container options check out this link.
– name: gogs-webservice
type: webservice
properties:
image: nimish8/gogs
cpu: “50m”
env:
— name: SOCAT_LINK
value: “false”
memory: “512M”
ports:
— port: 3000
expose: true
In the trait section of the service, first, we use napptive-ingress to expose the application to the internet. It also adds SSL certificates so we get HTTPS connection out of the box. The important thing to note is that the port defined here should match the service port that is being exposed above.
traits:
— type: napptive-ingress
properties:
name: gogs-ingress
port: 3000
path: /
Secondly, we define the storage trait to include persistent volume to the service as we have to store the repository data.
NOTE: use emptyDir instead of pvc if you are using a Napptive free account.
– type: storage
properties:
pvc:
— name: data
mountPath: /data/
resources:
requests:
storage: 1Gi
# emptyDir:
# — name: data
# mountPath: /data
Here we are mounting volume at /data path with 1 GB of storage.
Deploying a git repository with GOGS on Napptive
The best thing about Napptive is that deploying applications is one of the smoothest experiences that you might get. With added support with multi-zonality, you get an amazing experience with the security and control of your application, reduced latency, and instant spin-up of your entire application stack at once.
With that being said, let’s get started!
Step 1 — Login to Napptive Playground
Go to https://playground.napptive.dev and use any of the authentication methods listed to log in. If you do not have an account, it will automatically create one for you.

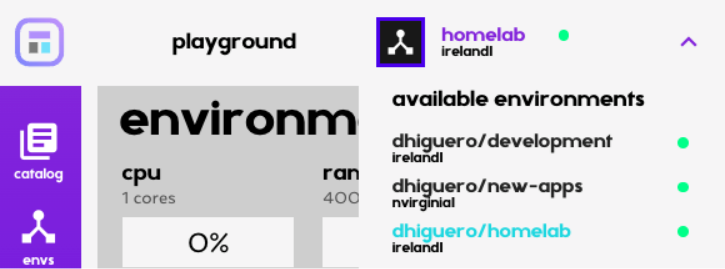
Step 2 — Select your environment
From the dropdown menu at the top left, select the appropriate environment where you want to deploy GOGS. Environments are associated with specific geographical zones, so choose the one that is closer to your final users for the best experience. For this example, we will deploy GOGS on the homelab environment, but any other environment will also work without any issues.
Step 3 — Open the Catalog to deploy GOGS
The Napptive Catalog provides a series of ready-to-deploy applications including databases, data scientist tools, development tools, and GOGS among others. Open the catalog through the top left-hand side icon on the sidebar, or through the Deploy app button on the top right-hand side corner. To learn more check how you can upload your own applications to the Catalog.
Next, choose ‘gogs’ on the list, and click deploy.

The next step will show you the application definition that will be deployed allowing you to customize it with your own preferences and requirements.

In the case of GOGS, there are several options that can be customized through the app.ini file. This file will be stored in a ConfigMap to facilitate the configuration. For a list of all the possible configuration options, check the GOGS app.ini specification.
Finally, click Deploy and wait for the services to get ready.
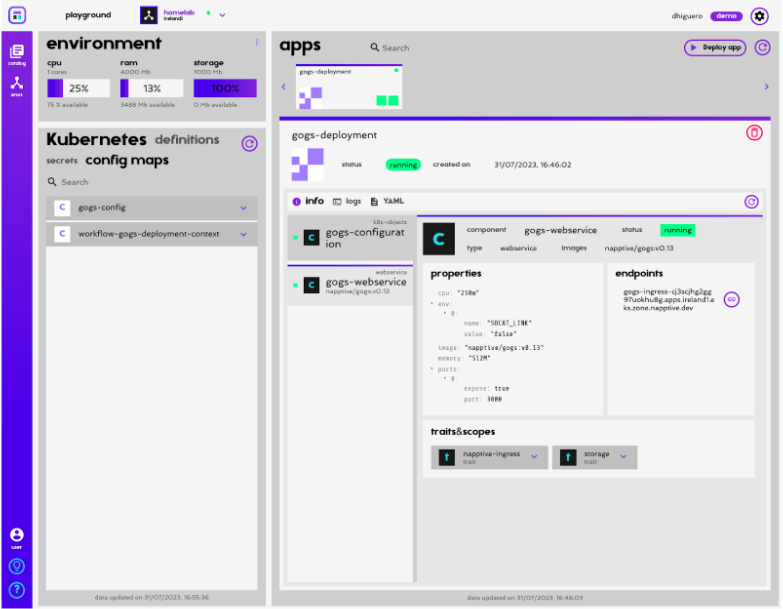
Results
Voila! There’s your own self-hosted git repository up and running! Click on the endpoints link to visit your application. You can check application logs by visiting the logs section.
Testing GOGS functionalities
Here are the configurations that I’m using for setting up GOGS:
Database Type: sqlite3
Path: (default)
Application URL: <your_gogs_deployment_url> (Important)
Default Branch: main
Admin user
IMPORTANT: Do not change Run User from git. It’ll raise a permission error otherwise.
Feel free to tinker with other configurations by setting up an SMTP server, integrating with other Databases, etc.
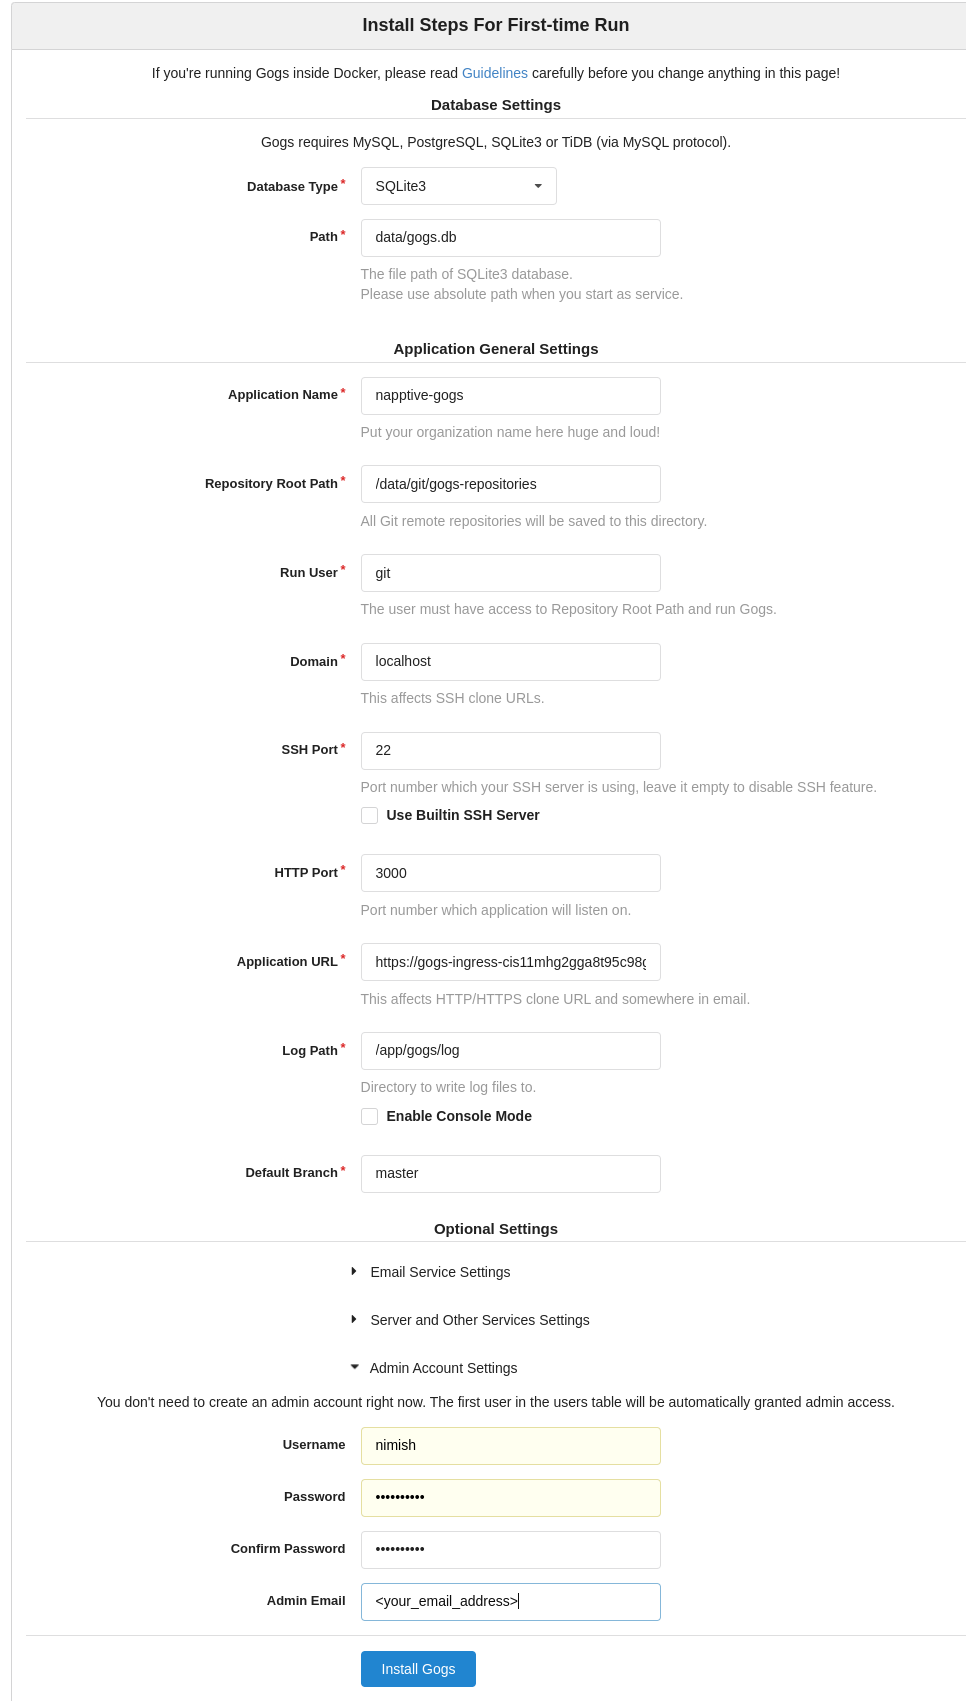
Then, click on Install Gogs.
You’ll be redirected to GOGS Dasboard.

Let’s perform a couple of Git operations, shall we?
Creating new repository:


Adding files to the repository:


After updating the README.md file, let’s pull the latest updated code!

As we can see, we have a fully working self-hosted Git repository service up and running and deployed with only a couple of clicks!
You can add more customizations to the config file according to your requirements. Check out GOG’s official documentation.
Conclusion
In this article, we’ve covered hosting your infrastructure securely by defining your application in OAM specification and deploying with Napptive, making deploying and maintaining your applications, both operational and consumer-facing applications, much easier.
By extending its capabilities beyond consumer-oriented applications, Napptive opens up a world of possibilities for entire organizations to streamline the deployment of operational applications.
In case you have not yet tried Napptive, we encourage you to sign up for free and discover how we are helping propel the development of cloud-native apps.