

Host your IDE
In this 3 part series of articles, we aimed to demonstrate how you can easily deploy operational applications with Napptive. In the previous two articles, we’ve discussed how you can deploy your own Git service, using GOGS followed by the deployment of an agile project management software, where we used Taiga to demonstrate the ease of deployment of operational applications with Napptive. This is aimed at reducing deployment time to a very minimum and increasing the efficiency of the operation team of your organization. As stated before, the deployment and configuration of operational applications are as critical to an organization as consumer-facing applications. With Napptive’s IDP, you can seamlessly deploy any app, with ease.
In this final article of the series, we are going to go ahead and integrate our Git service with one of the most popular open-source code editors and IDEs: Visual Studio Code. We will show how with Napptive, you get a secure and production-ready VSCode application with support for integration across multiple applications. As well as this, you can use a shared environment to facilitate reusability and efficient usage of existing infrastructure.
Deploying OAM of VS-Code to Napptive
The OAM definition of our application will look like this. You can modify the definition to include more customizations if required.
NOTE: Please change the password and sudo password properties in the Secret (in base64 format).
apiVersion: core.oam.dev/v1beta1
kind: Application
metadata:
  name: vscode-nodejs
  annotations:
    version: playground
    description: "VSCode IDE with Playground CLI"
spec:
  components:
    - name: vscode-configurations
      type: k8s-objects
      properties:
        objects:
          - apiVersion: v1
            kind: Secret
            metadata:
              name: vscode-secrets
            type: Opaque
            data:
              password: cGFzc3dvcmQ=
          - apiVersion: v1
            kind: ConfigMap
            metadata:
              name: vscode-configs
            data:
              PUID: "1000"
              PGID: "1000"
    - name: vscode-nodejs
      dependsOn:
        - vscode-configurations
      type: webservice
      traits:
        - type: playground-injector
        - type: napptive-ingress
          properties:
            name: vscode
            port: 8080
            path: /
        - type: storage
          properties:
            pvc:
              - name: vscode-pvc
                mountPath: /config
                resources:
                  requests:
                    storage: 1Gi
      properties:
        image: napptive/vscode-nodejs:latest
        cpu: "500m"
        memory: 2G
        ports:
          - port: 8080
            expose: true
        env:
          - name: PUID
            valueFrom:
              configMapKeyRef:
                name: vscode-configs
                key: PUID
          - name: PGID
            valueFrom:
              configMapKeyRef:
                name: vscode-configs
                key: PGID
          - name: PASSWORD
            valueFrom:
              secretKeyRef:
                name: vscode-secrets
                key: passwordCode language: YAML (yaml)
Step 1 — Login to the Napptive Playground
Go to https://playground.napptive.dev and use any of the authentication methods listed to log in.

Step 2 — Select your environment
From the dropdown menu at the top left, select the appropriate environment where you want to deploy VSCode. Environments are associated with specific geographical zones, so choose the one that is closer to your final users for the best experience. Using your own zone also enhances security and control for your applications. For this example, we will deploy VSCode on the test environment, but any other environment will also work without any issues.

Step 3 — Open the catalog to deploy Vscode
The Napptive Catalog provides a series of ready-to-deploy applications including databases, data-scientist tools, development tools, and many more. Open the catalog through the top left-hand side icon on the sidebar, or through the Deploy app button on the top right-hand side corner. If you are interested in learning more, check how you can upload your own applications to the Catalog.

The next step will show you the application definition that will be deployed allowing you to customize it with your own preferences and requirements.
Update password with a custom one (base64 encoded) in K8s secret object.

Note: Default password: “password”
Step 4 — Click ‘Deploy’ and wait for the application to start

Step 5 — Click on the URL in the endpoints section to open VSCode
Enter the password that you’ve set in the previous step to access VSCode.


Deploy a shared Git Repository with GOGS on Napptive
Deploy GOGS from the Napptive Playground Catalog. Follow this article for a detailed walkthrough. The Napptive catalog enables the reusability of applications on your existing infrastructure and easy deployment within clicks.
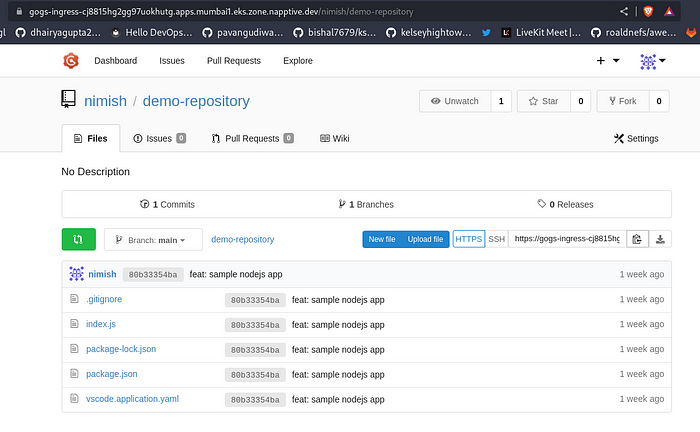
After successful deployment, set up a username and password for the initial user (explanation in the article). Then let’s create a new repository “demo” in GOGS.


Configure GOGS on VSCode:
Now you have a fully working Linux machine on Napptive with VSCode on it and you can configure git to integrate with GOGS with ease.
Step 1: Open the terminal in the VSCode application and configure git
$ git config --global user.email "<your_email_address_configured_in_gogs>"
$ git config --global user.name "<username_configured_in_gogs>"Code language: PHP (php)

Step 2: Clone remote repository
From the GOGS repository copy the remote link.

And run:
$ git clone https://gogs-ingress-cj8815hg2gg97uokhutg.apps.mumbai1.eks.zone.napptive.dev/nimish/demo-repository.gitCode language: PHP (php)
NOTE: If you are asked to give a password, put the password that you’ve set during creating an account during deploying GOGS.

Step 3: Open the folder in the VSCode workspace from File > Open Folder


Demo: Creating a sample NodeJS/ExpressJS application
Step 1: Initialize the NodeJS project and install dependencies
Run:
$ npm init -y
$ npm install express
And add the start script to package.json
{
  "name": "workspace",
  "version": "1.0.0",
  "description": "",
  "main": "index.js",
  "scripts": {
    "start": "node index.js"
  },
  "keywords": [],
  "author": "",
  "license": "ISC",
  "dependencies": {
    "express": "^4.18.2"
  }
}Code language: JSON / JSON with Comments (json)
Step 2: Write express server
This will spin up a very basic express server at port 5000.
const express = require("express");
const app = express();app.get("/", (req, res) => {
    res.send("HELLO FROM NAPPTIVE EXPRESS! (VSCODE)")
})app.listen(5000, () => {
    console.log("Server started")
})Code language: PHP (php)
Step 3: Testing
To test the server, run:
$ npm run start

To access your server:
URL: <napptive-vscode-url>/proxy/<PORT>

Step 4 — Push updates to the remote GOGS repository
$ git add .
$ git commit -m : 'feat: sample nodejs app'
$ git push origin mainCode language: JavaScript (javascript)
Deploying application to Napptive Playground using VSCode and Playground CLI
Now we are ready to deploy our sample NodeJS/ExpressJS server to Napptive using built-in playground CLI.
Step 1 — Write a simple OAM definition for the application
Here we are using the Nodejs launcher application provided by Napptive to easily spin up our application without even needing to containerize our application.
NOTE: Change the value of LAUNCHER TARGET REPO to the GOGS repository URL. Pass username and password if required.
apiVersion: core.oam.dev/v1beta1
kind: Application
metadata:
  name: demo-nodejs-application
  annotations:
    version: 0.10.1
    description: "demo-node-js"
spec:
  components:
    - name: deploy-nodejs-comp
      type: webservice
      properties:
        image: napptive/playground-launcher-nodejs:18-v1.0.0
        cpu: "150m"
        memory: 256Mi
        # (Optional) if the application exposes a port
        ports:
            - port: 5000
              expose: true
        env:
            # GitHub repo url
            - name: LAUNCHER_TARGET_REPO
              Value: <GOGS_REMOTE_URL>
      traits: # Traits section
        # (Optional) If your application requires to be publicly available to the Internet
        - type: napptive-ingress
          properties:
            #  Port (should match the exposed port on the component)
            port: 5000
            path: /Code language: YAML (yaml)
Step 2 — Login to playground CLI in the VSCode terminal
Run the following command and follow the instructions to log in to the Playground CLI.
$ playground login --headless
After successful login, run the following command to check if Playground CLI is able to access your environment.
$ playground env listCode language: PHP (php)

Step 3 — Deploy your sample application using Playground CLI
$ playground apps deploy <oam_file>.yamlCode language: HTML, XML (xml)

Step 4 — Check the status of the application
Run:
$ playground apps


Step 5 — Access your application using the endpoints URL

That’s it! It’s really that simple to develop applications using a self-hosted IDE, Git repository, and project management system. You can further integrate databases into your services and the Napptive catalog offers a wide range of databases to choose from with a seamless integration experience.
Conclusion
In this article series, we’ve covered the invaluable advantages of deploying essential operational applications within Napptive’s IDP that play a crucial role in any organization. We started by delving into the deployment of a self-hosted robust Git repository system, GOGS, to highlight the importance and benefits of the reusability of infrastructure applications using the Napptive platform. Then we’ve emphasized the importance of Agile software development and demonstrated a complete deployment of the robust Agile Project Management System, Taiga.
Finally, we’ve integrated everything by deploying VSCode and using it in conjunction with GOGS, to demonstrate the reusability of applications within a shared environment.
We hope this article series has illustrated the importance of operational application deployment and how Napptive makes it easy to deploy and maintain, not only operational but any kind of production application. We highly encourage you to explore our platform and experience the benefits that Napptive’s IDP provides to your organization.